Creating XLSX Documents in Javascript (Advanced)
In this post we’ll look at how to create XLSX documents in JavaScript with more advanced features such as custom styling and formulas using the xlsx & js-xlsx packages. This works in both NodeJS and React.
What we are Making
- If you only need to write text to your XLSX document and don’t require any styling, then the basic version of this guide may be quicker and more suitable.
Installing Requirements
Install the xlsx & js-xlsx packages using the following command:
1
npm i xlsx js-xlsx
Data Types
Each sheet in the document will be represented by an Object. The keys of this Object will be the name of the cells (A1, A2, B2, etc).
Each cell in our output document will be represented by another Object. This object will contain information such as the value of the cell, styling, and the output format (number, date, percentage, etc).
More information about supported data types can be found on the XLSX package documentation page here.
Time for examples!
String
1
2
3
4
5
6
7
8
9
10
11
12
13
14
15
16
17
18
19
20
21
// import XLSX from 'xlsx'; // Use this for React
const XLSX = require('xlsx');
const JS_XLSX = require('js-xlsx');
// Create a new blank XLSX Document
let workbook = XLSX.utils.book_new();
// The data that will be added to the sheet
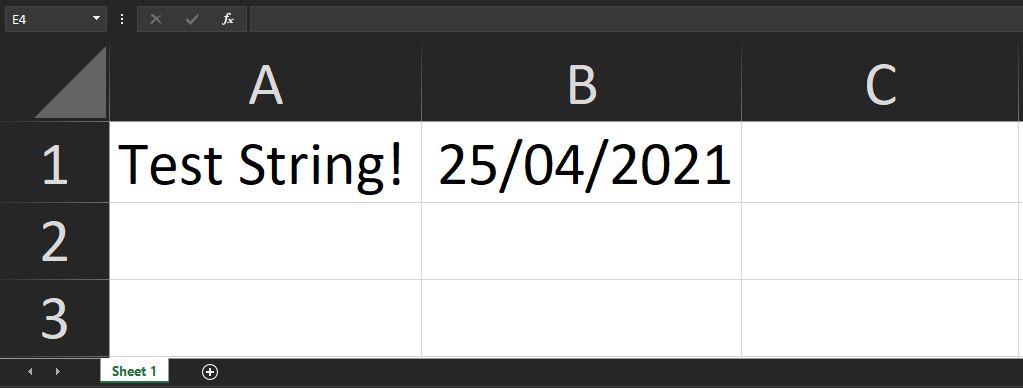
let worksheetData = {
'!ref': 'A1:A1', // Sheet Range (Which cells will be included in the output)
'A1': {
t: 's', // Type
v: 'Test String!', // Value
},
};
// Add the sheet to the workbook
XLSX.utils.book_append_sheet(workbook, worksheetData, 'Sheet 1');
// Save the XLSX File
JS_XLSX.writeFile(workbook, 'FILE_NAME.xlsx');

- The
!refmust contain the output range of the sheet. Cells that are not in this range will not be rendered. - The
tkey in theA1Object stands forType. The value of's'stands forString/Text. - The
vkey in theA1Object stands forValue. The value here is the text we want in the cell.
Date
To insert a Date, we use the a value of 'd' in the Type field:
1
2
3
4
5
6
7
8
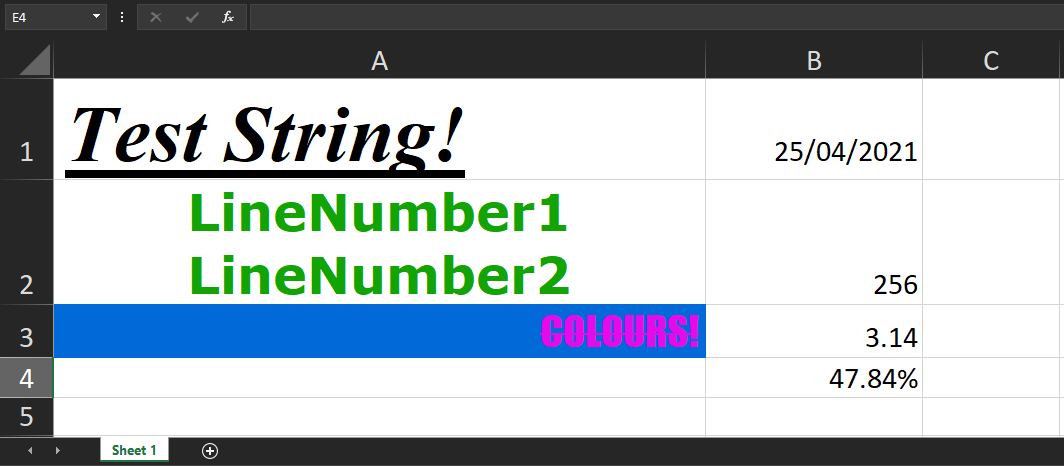
let worksheetData = {
'!ref': 'A1:B1',
'A1': { t: 's', v: 'Test String!' },
'B1': {
t: 'd', // Type
v: (new Date()) // Value
}
};
Number
When working with numbers we need to specify the number format. We do this by adding another key s which stands for Style/Theme. An Object must be provided as the value and contain a key called numFmt which specifies the number format (Integer, Float, Percentage, Fraction, etc).
1
2
3
4
5
6
7
8
9
10
11
12
13
14
15
16
17
18
19
20
21
22
23
24
25
26
27
28
29
30
31
32
33
let worksheetData = {
	'!ref': 'A1:C2',
	'A1': {
		t:'n', // Type
		v: 256, // Value
		s: { numFmt: 1 } // Style
	},
	'B1': {
		t:'n',
		v: 3.14159,
		s: { numFmt: 2 }
	},
	'C1': {
		t:'n',
		v: 0.47836,
		s: { numFmt: 10 }
	},
	'A2': {
		t:'n',
		v: 0.47836,
		s: { numFmt: 11 }
	},
	'B2': {
		t:'n',
		v: 0.47836,
		s: { numFmt: 12 }
	},
	'C2': {
		t:'n',
		v: 21567.489,
		s: { numFmt: '_-"$"* #,##0.00_-;\\-"$"* #,##0.00_-;_-"$"* "-"??_-;_-@_-' },
	},
};
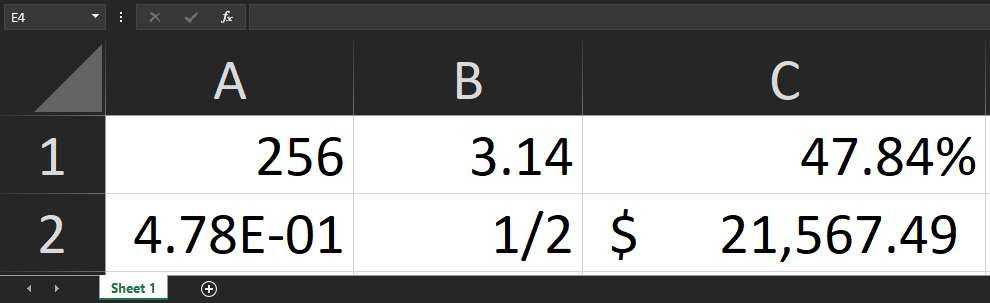
numFmt: 1means Integer (1, 2, 3 , etc).numFmt: 2means Float (0.523, 11.25, etc).numFmt: 10means Percentage (0.85%, 59.23%, etc).numFmt: 11means Scientific Notation (3.94E+03, 6.85E-01, etc).numFmt: 12means Single Digit Fraction (1/3, 6/7, etc).numFmt: '_-"$"* #,##0.00_-;\\-"$"* #,##0.00_-;_-"$"* "-"??_-;_-@_-'mean Accounting mode ($23,582.64, $0.32, etc).- A more complete list of these codes can be found here.
Styling
We can modify the styling by supplying additional parameters to the Object in the s field.
Documentation with additional options can be found here.
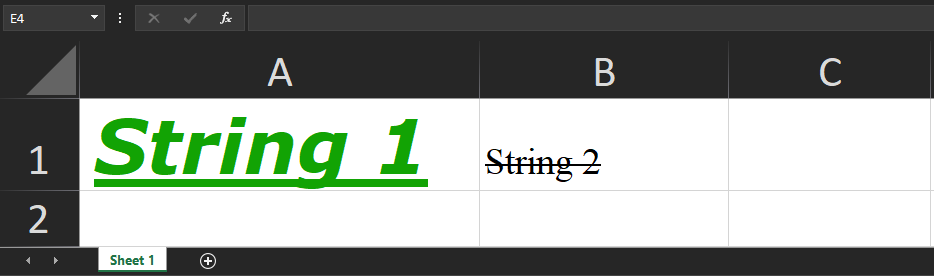
Font
1
2
3
4
5
6
7
8
9
10
11
12
13
14
15
16
17
18
19
20
21
22
23
24
25
26
27
28
let worksheetData = {
	'!ref': 'A1:B1',
	'A1': {
		t: 's',
		v: 'String 1',
		s: {
			font: {
				name: 'Verdana',
				sz: 20,
				bold: true,
				underline: true,
				italic: true,
				color: { rgb: 'FF12A304' },	// Hex Value: ARGB
			}
		}
	},
	'B1': {
		t: 's',
		v: 'String 2',
		s: {
			font: {
				name: 'Times New Roman',
				sz: 10,
				strike: true,
			}
		}
	},
};
Alignment
1
2
3
4
5
6
7
8
9
10
11
12
13
14
15
16
17
18
19
20
21
22
23
24
25
26
27
28
29
let worksheetData = {
	'!ref': 'A1:B1',
	'A1': {
		t: 's',
		v: 'String 1',
		s: {
			font: {
				name: 'Verdana',
			},
			alignment: {
				horizontal: 'left',
				vertical: 'bottom',
			}
		}
	},
	'B1': {
		t: 's',
		v: 'String 2',
		s: {
			font: {
				name: 'Arial',
			},
			alignment: {
				horizontal: 'right',
				vertical: 'top',
			}
		}
	},
};

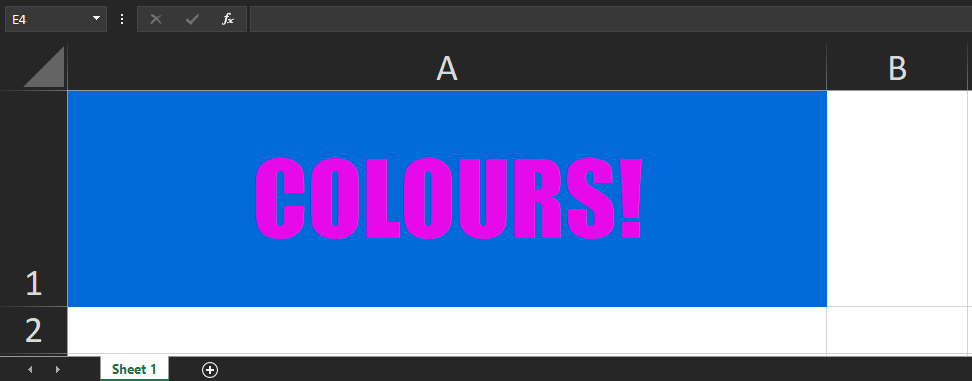
Fill
1
2
3
4
5
6
7
8
9
10
11
12
13
14
15
16
17
18
19
20
21
let worksheetData = {
	'!ref': 'A1:B1',
	'A1': {
		t:'s',
		v: 'COLOURS!',
		s: {
			font: {
				name: 'IMPACT',
				sz: 32,
				color: { rgb: 'FFE609EA' },	// ARGB Hex Value
			},
			fill: {
				fgColor: { rgb: 'FF0269D8' },	// ARGB Hex Value
			},
			alignment: {
				horizontal: 'center',
				vertical: 'center',
			}
		}
	},
};
Formulas
At the time of writing the js-xlsx module doesn’t yet support formulas. This is inconvenient because the xlsx module does support formulas, but it doesn’t support styling. We don’t want to choose between styling and formulas, we want both.
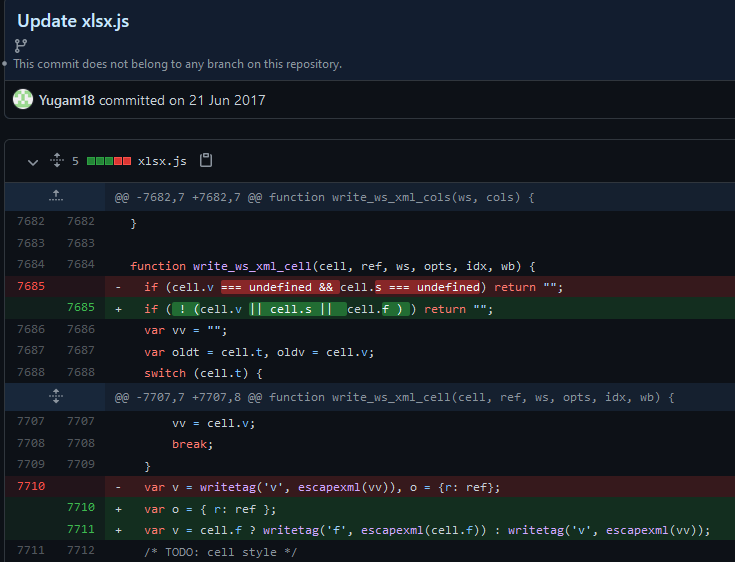
Luckily, there are smart people who’ve had the same issue and made a fix!
How do I Make it Work?
For reference the package versions being used in this guide are:
js-xlsx: 0.8.22xlsx: 0.16.9
From the above screenshot we can add formula support into js-xlsx with 2 small code changes:
- Open the file
node_modules/js-xlsx/xlsx.js. - Replace line
7685with the following line:1
if ( ! (cell.v || cell.s || cell.f ) ) return "";
- Replace line
7710with the following 2 lines:1 2
var o = { r: ref }; var v = cell.f ? writetag('f', escapexml(cell.f)) : writetag('v', escapexml(vv));
- Done!!!
Formula Example
To add a formula we need to create an f key in our cell Object and store our formula there:
1
2
3
4
5
6
7
8
9
10
11
12
13
14
15
16
17
18
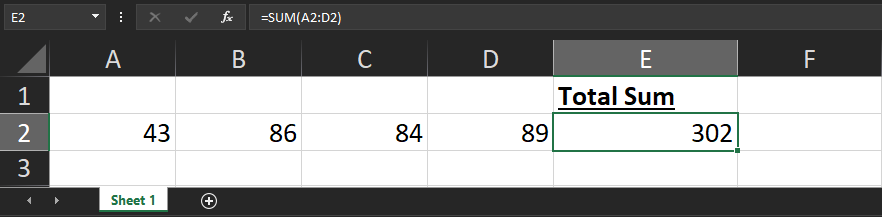
let worksheetData = {
'!ref': 'A1:E2',
// Generate some random values in the second row
'A2': { t: 'n', v: Math.round(Math.random()*100), s: { numFmt: 1 } },
'B2': { t: 'n', v: Math.round(Math.random()*100), s: { numFmt: 1 } },
'C2': { t: 'n', v: Math.round(Math.random()*100), s: { numFmt: 1 } },
'D2': { t: 'n', v: Math.round(Math.random()*100), s: { numFmt: 1 } },
// Add a header
'E1': { t: 's', v: 'Total Sum', s: { font: { bold: true, underline: true } } },
// Add formula
'E2': {
t: 'n',
f: 'SUM(A2:D2)'
},
};